Auerstadt

October 14, 1806


Napoleon's move in the direction of Dresden and Berlin convinced the Prussian/Saxon army to fall back in that direction.  While Hohenlohe near Jena protected the Prussian retreat, the Duke of Brunswick fell back toward Dresden.  The Prussian army needed to occupy the Pass of Kosen to retreat safely to the northeast, but Brunswick's army did nothing to occupy it on the evening of October 13th - slowed, perhaps, by poor staff work and the use of only a single road.  They would resume the march the next morning.

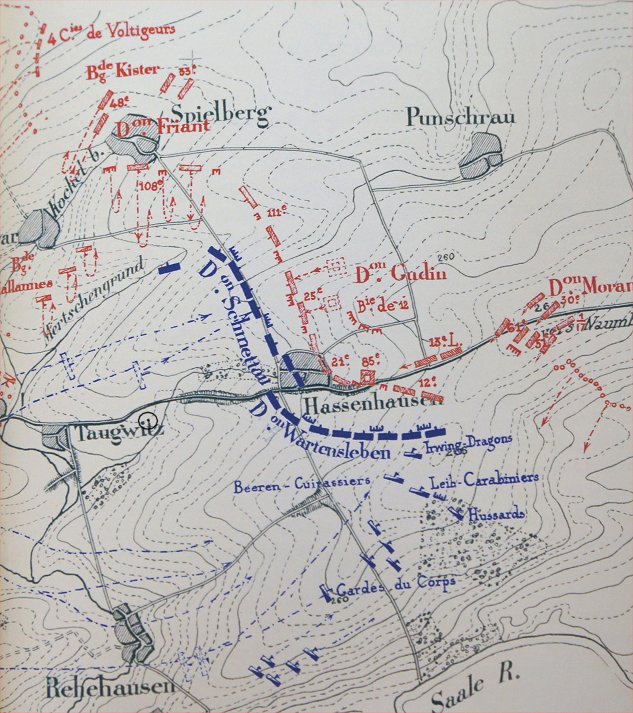
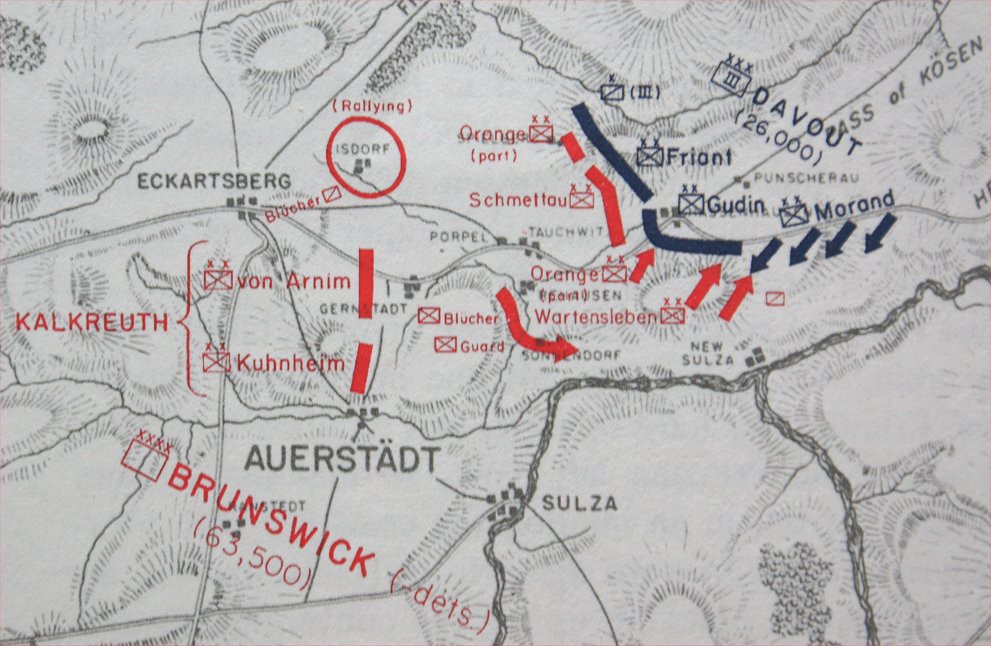
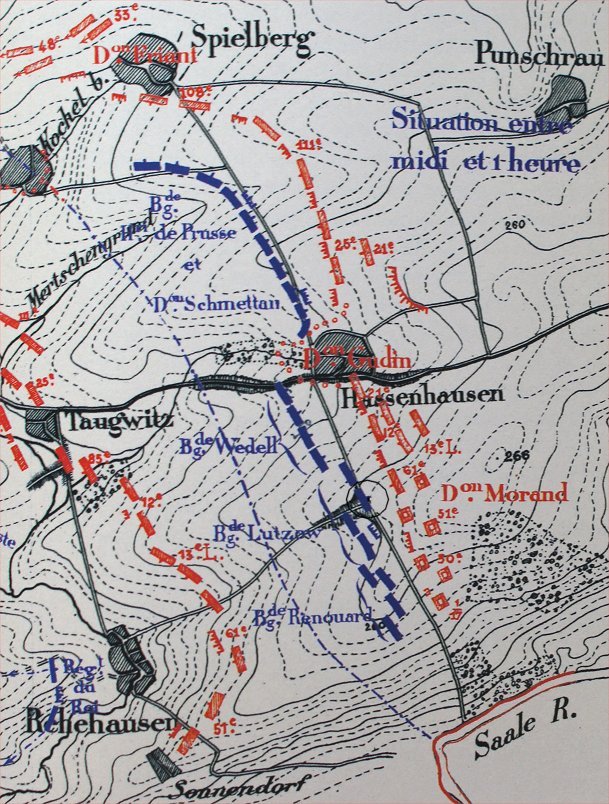
To the east, Davout's 26,000 man III Corps was between Naumburg and Kosen, and on the morning of October 14th, they crossed the Saale and marched west, occupying Hassenhausen, arriving before the Prussians and cutting off the line of retreat of the Prussian army.  In the battle that followed, although Bernadotte's 20,000 man I Corps was also near Naumburg, Bernadotte did not support Davout, instead marching south to join Napoleon, which he was unable to do in time to join the fight at Jena.

With 63,000 men, the Prussian commander, the Duke of Brunswick had more than enough men to not only reopen his line of retreat but also to destroy Davout's isolated corps.  The Prussian army, however, did not understand the new operational level of warfare.  Rather than move in formations of several all arms corps using several roads, Brunswick moved all his men over one road.  Unable to maneuver around Davout, the Prussian army attacked him sequentially and was defeated in detail.

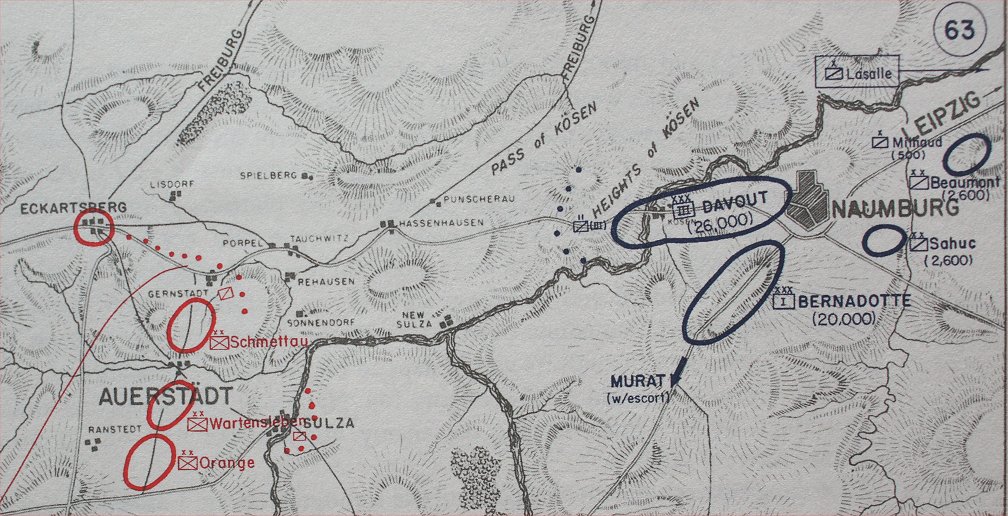
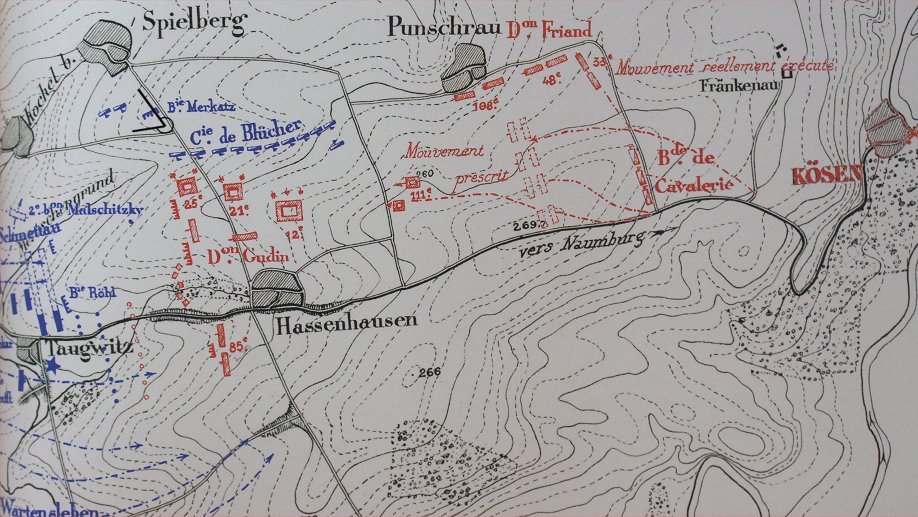
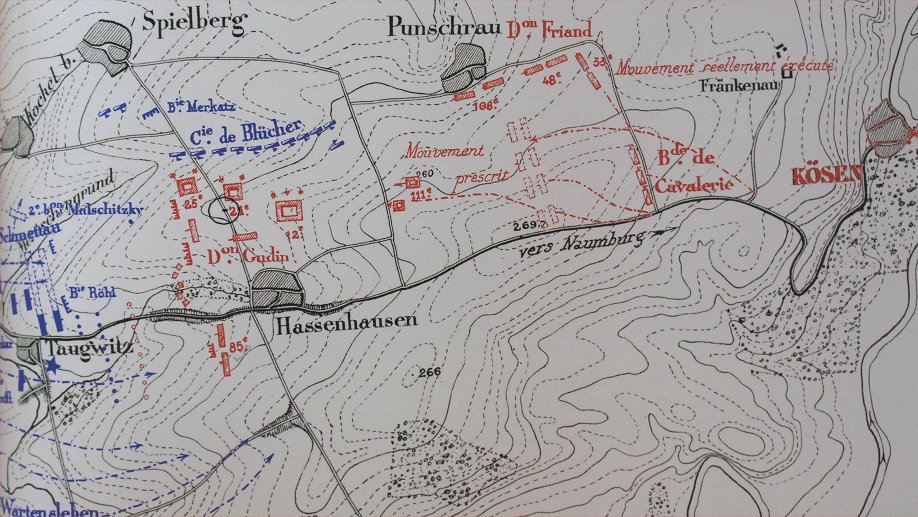
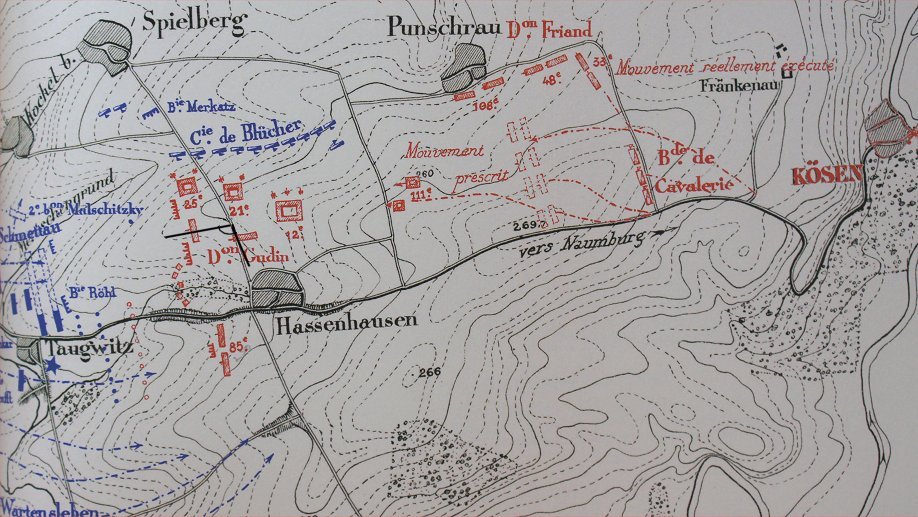
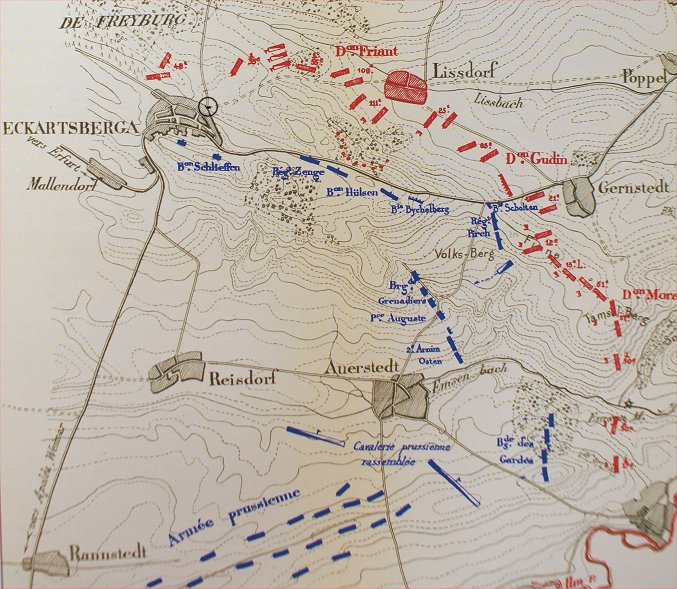
The more conceptual West Point maps used here depict the French in blue and the Prussians in red.  Bressonet's maps with topographical features are the opposite color scheme.


Saale at Kosen


Blucher Attacks

Gudin's Division of Davout's III Corps was first to arrive at Hassenhausen in the morning fog.  While Schmettau's division of Prussian infantry was preparing to attack Gudin, at 9am Blucher attacked Gudin without coordinating with the infantry, hoping to capitalize on the fog with a surprise flank attack.  Earlier in the day Blucher had bullied his cavalry ahead of the infantry, disrupting and delaying the army's march at the town of Auerstadt.


Near 21st Line

Forming square, French infantry was supported by artillery at the angles of the squares.  A battery of Prussian artillery under Merkatz was on the crest of the ridge opposite where "Road to Spielberg" can be seen in the panorama above.  Blucher's cavalry in line along the ridge advanced along the axis of the road, but the right flank of Heising's Kurassier Regiment was hit from behind by friendly fire from Merkatz's artillery.  This put the line in disorder, and it fell back.  Blucher resumed the charge - how many charges were made is not known, but they seem to have been until exhaustion, and they lasted only 15 to 30 minutes.  Eventually, however, Blucher's horse was shot from underneath him, and his cavalry fled the field.  Blucher's four regiments were smashed with but little damage done to the French.  Blucher's best attempts to rally his men in Spielberg failed miserably, and his cavalry fled toward Eckartsburg, playing no more role in the battle.


Schmettau Attacks


Meanwhile, Schmettau had been deploying his division north of Taugwitz, with infantry regiments in two lines supported by a third line of cavalry.  The Duke of Brunswick and the King were with the division.  French artillery put the Prussians in some confusion.  In fact, they were already somewhat confused from the hasty and poorly managed march.  At around 9am, when Blucher began his attack, Schmettau's division began an  advance on Hassenhausen.  Krafft's Grenadier Bn. advanced toward the 85th Line and battled with them in a wooded area along a stream flowing west out of Hassenhausen through the hollow shown here. 

The attack had only gotten 80 paces when it was halted by Brunswick's order.  Brunswick, seeing that the heights south of Hassenhausen were defended by only the overstretched French 85th Line which was occupied by an attack to its front, ordered Schmettau to wait for Wartensleben's division to form on the right for a concerted attack.  Malschitzky's regiment on Schmettau's left flank was mortified as they felt confident in their ability to take the high ground in front of them.  The halt order prevented a concerted combined arms attack with Blucher's cavalry. 

Due to terrain alone, let alone the now lifting fog, the French could see little of the area south of Hassenhausen.  This much you can see from here as the area behind the ridge on the left half of the panorama is obscured - the area in which Wartensleben was to advance.  So Davout was unaware of the danger to his left.  Blucher's failed attack, however, had shown the vulnerability of his right, so he directed Friant's division to that flank.


Friant Moves Forward

The 108th and 48th of Friant's division with the Chasseurs a Cheval marched west on the "Road from Punschrau" seen above, then turned right onto the prominent road seen here.  Reaching the intersection on the right side of the panorama, they turned left on the road to Spielberg.  The French were seeking to extend their right flank.  


Friant Arrives and Schmettau Attacks

Merkatz's battery, even after Blucher's repulse, advanced another 150 paces to fire into Gudin's right flank.  The 25th Line sent four companies of tirailleurs toward Merkatz.  These men combined with Friant's men arriving in their rear captured all but one of the battery's guns and drove off two remaining squadron's of cavalry supporting the guns.   This was around 9:15 to 9:30.

With Merkatz out of the way, Friant's division was able to work around the Prussian left flank.  The French cavalry continued the attack - this time on the isolated Stankar's battery then through two lines of Prussian infantry.  Schmettau's supporting cavalry counterattacked, forcing the chasseurs a cheval back through the Prussian infantry.  Only half made it back to French lines, but the action separated Schmettau's supporting cavalry from the division's infantry.   By now, after the delay for Wartensleben to deploy and advance, Schmettau had also advanced.  From their start line north of Taugwitz, Schmettau advanced up to the Spielberg - Hassenhausen road - the prominent road in the panorama above.  As they advanced, the second line came forward to fill gaps in the first line.  French skirmishers harassed the advancing Prussians from front and flank.  Brunswick ordered Col. Sharnhorst north to the action.  Eager to get away from Brunswick, Scharnhorst managed this fighting for the remainder of the day despite there being two brigadiers on site.  

At around 10:00, Friant's 108th with other troops to their right advanced toward Schmettau's exposed left flank.  The French withdrew mysteriously, though, because part of another Prussian division under Orange was arriving on their flank.    


Duke of Brunswick Mortally Wounded


On the left side of the panorama, Schmettau's division supported by Orange attacked Hassenhausen.  Wartensleben was to the right of Schmettau.  Above the black Mercedes you can see how the ridge peaks.  It was beyond this, blocked from view of the French in Hassenhausen, that Wartensleben advanced.

The Duke of Brunswick with the leftmost battalion of Wartensleben's division was mortally wounded, struck down by fire from French tirailleurs.  This left King Frederick William in charge, although there appears to have been a delay in telling him.  Frederick William was no Frederick the Great, that much was obvious.  To compound the matter, Brunswick's chief of staff, Scharnhorst, was on the left flank, and he too was not immediately informed.  Schmettau was also mortally wounded, and Wartensleben was struck off his horse.  Although Prussian leadership was hard hit, the attack continued.


Recap With Map

While the repulsed Blucher was reforming, Friant's division had arrived, deploying on Gudin's right to protect Davout's right flank.  While Schmettau with the help of a portion of Orange's Division attacked Hassenhausen, Wartensleben moved against Gudin's exposed left flank.  Fortunately for Davout, Morand's division was arriving in time to restore the situation.


Wartensleben  Attacks Gudin's Left

It was now around 10:30.  Hidden from the French as it advanced, Wartensleben's division emerged atop the ridge and wheeled toward the Hassenhausen-Kosen road and into the French flank.  The panorama above was taken near the refused French flank.  The Prussians of Wartensleben's division were in the field on the left of the panorama in a line extending toward Hassenhausen, which the Prussians had captured.  Attacking toward the Hassenhausen-Kosen road, the Prussians were able to cross the road and push the French infantry back into a line with their artillery on the hill beyond.  The Prussians seemed well situated to put the French to flight.

On their right, however, on a hill now occupied by a tower, Davout's final division, that of Morand, was arriving on the run.  Seeing the desperation of the situation, Davout ordered the first of three arriving brigades, that of d'Honnieres' composed of the 13th Legere, to continue straight down the road.  The 13th Legere smashed into the Prussian right then continued and recaptured Hassenhausen.  Continuing beyond the village, they were before being ejected back to east of the village, but their costly attack had helped stabilize Davout's battered corps.


Morand vs. Prussian Cavalry

In this 360 degree view along this post-war road, you can see on the right Hill 266, which the right flank of Wartensleben's infantry had passed on their way into Gudin's flank.  Behind the infantry were cavalry commanded by Prince William, who was watching the battle unfold from the hill.

Morand's division was arriving along the Hassenhausen-Kosen Road near where the modern tower is now.  Although the leading brigade headed straight for Hassenhausen, at around 10:40am the remaining two brigades moved into the fields on the left side of the panorama in column formation with a thick cloud of skirmishers to their front.  Facing them were Prussian cavalry preparing to attack them.  Morand advanced and changed his battalions into square formations.  Immediately after forming square, the French squares and supporting artillery were attacked by 300 horsemen under Prince William.  Half the cavalrymen fell, including Prince William himself, who was wounded.  With nothing else to stop Morand from smashing the Prussian flank, additional Prussian cavalry attacked, but they were all repulsed, and Morand continued forward.


Wartensleben and Lutzow vs. Morand

In a fighting retreat, Wedell's brigade of Wartensleben's division fell back behind this road - but nearer to Hassenhausen.  Wartensleben's right was Renouard's brigade, but several hundred yards separated Renouard from Wedell.  Where we are standing was the gap.  Lutzow's brigade of Orange's division arrived at around 11:50 and set up a defense, having pushed back Morand's tirailleurs, which had reached Rehehausen.  (Orange's division had been split up earlier in the battle in order to attack each French flank.)  Now the Prussians formed a solid line.  Pushing back the tirailleurs revealed a French battery which began firing canister shot into the Prussian infantry.  (This occured on the far right of the panorama.)  A Prussian battery responded, briefly silencing the French guns.  Taking advantage of this, the Prussian infantry attacked.  It was now about noon.  French infantry appeared, and a prolonged firefight ensued.  The French 61st attacked where we are standing now.  On the right side of the panorama, the 51st attacked the Prussian battery.  Then, a squadron of the Prussian Gardes du Corps attacked the 51st while Mollendorf's Regiment emerged from the road from Rehehausen and also attacked the 51st.  The 51st held, and the 30th attacked the battery and the flank of Mollendorf's Regiment.  Now, about 12:30, Lutzow's brigade fell back followed by the whole Prussian right flank.  Morand continued forward in pursuit to the Lissbach at Rehehausen where a rearguard action allowed Wartensleben and Lutzow to escape. 

The French recaptured Hassenhausen, and Morand was now in position to enfilade the Prussian line to his right.  On Davout's right, Friant had worked around the Prussian flank.  Although Davout now had no reserves of note remaining, he was pushing back his much more numerous foe.  The King ordered a retreat.  


Eckartsberg

As the Prussian army was starting to fall apart, Kalkreuth's divisions under von Arnim and Kuhnheim came into line.  They too were flanked and forced back from Gernstedt to Eckartsberg.  On the ridge parallel with the road to Hassenhasuen, Kalkreuth made a stand against Gudin.  Friant's division, however, was working around the Prussian flank toward Eckartsberg.   


From Eckartsberg Castle

From Eckartsberg Castle there is a wonderful view of where the final stages of the battle were fought.  Skirting the Freyburg Forest, Friant's division moved around the Prussian left.  This, combined with a French attack on the Prussian right at Auerstadt, put the Prussians to flight.

In this meeting engagement, Davout had been forced to commit his whole force as it arrived on the battlefield, and despite being vastly outnumbering, he successfully flanked the Prussians on both their left and their right and routed them.  It was perhaps the most impressive victory of the Napoleonic Wars.  Twenty six thousand French had beaten 63,000 Prussians, inflicting 15,000 casualties and capturing 115 guns at the cost of 8,000 men.  A decisive defeat was prevented only by the lack of an artillery and cavalry reserve, formations that an army would have but a corps would not.  Decisive action was also prevented by the failure of Bernadotte to support Davout with his corps.  Bernadotte had the potential to attack into the Prussian right, but instead he moved between Davout and Napoleon, aiding neither to any significant degree.  Although there is no proof, some suggest that Bernadotte was eager to see a rival within the army crushed - this potentially unhealthy competion within the army was a flaw in Napoleon's political situation.

The withdrawal of the Prussian-Saxon Army toward Dresden and Berlin had been blocked by Davout.  Now, instead of retreating northeast, the Prussians were feeing to Wiemar to the west.  In the coming days, Napoleon exploited the victories at Jena and Auerstadt to the full, capturing a number of fortresses, occupying the Prussian heartland, and advancing into Poland where he battled the remnants of the Prussian army and the Russian army.  The Treaty of Tilsit finally ended the war in July 1807 with   Prussia humiliated, losing half its territory and half its population.

Forced to participate in Napoleon's 1812 invasion of Russia, the ensuing disaster allowed Prussia to turn on Napoleon and fight a successful war of liberation in 1813.       


Copyright 2012-13 by John Hamill


Back to John's Military History Tour of Europe