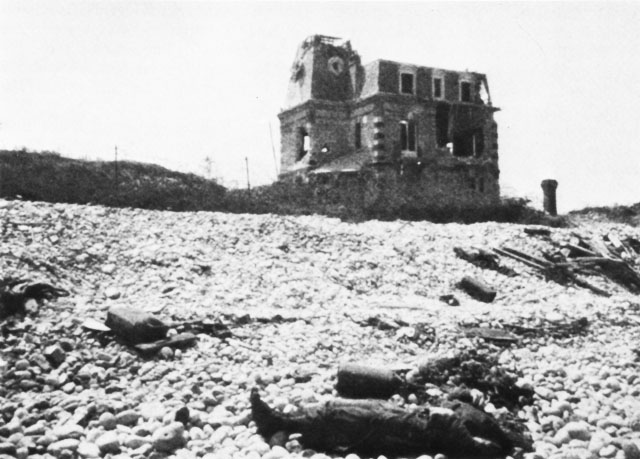
On the left side of the draw beyond the bank was barbed wire, untouched by the bombardment, then a dirt road. Beyond the dirt road was a three story house with a machine gun nest. To try to advance beyond the bank would be suicidal.
|
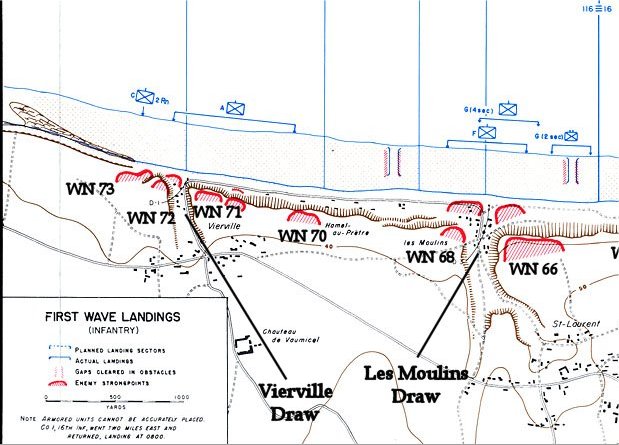
Strong currents and poor visiblity took the men of Companies G, F, and
E of the 116th far from their intended landing areas. Instead of
landing with Co. A near Vierville Draw, Company E would fight a mile
away with the 1st Division. Companies G and F in twelve LCVPs
would land near Les Moulins Draw. Exiting each boat in three
files 400 yards from enemy pillboxes, the men were initially not fired
upon. Once Most of the men were out, though, the Germans opened
up with machine guns. Some men took cover behind beach obstacles.
Others ran and made it to the embankment at the end of the beach.
Casualties were high, but not as high as at Vierville Draw.
Here, the bluffs were far enough back from the beach so that they
could not rake the beach; enemy fire was from the front but not
from the flanks. Sherman tanks also provided cover and support. On the left side of the draw beyond the bank was barbed wire, untouched by the bombardment, then a dirt road. Beyond the dirt road was a three story house with a machine gun nest. To try to advance beyond the bank would be suicidal. |


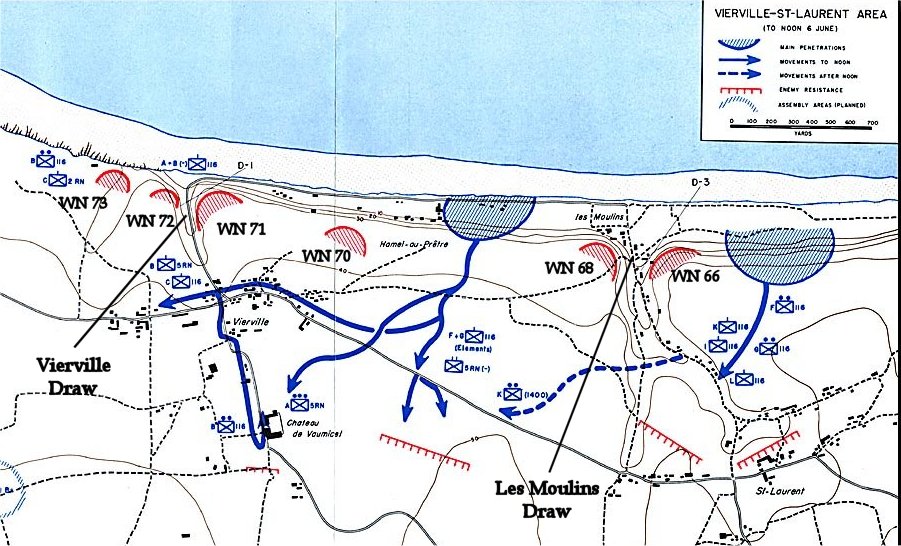 |
Cota could see that the invasion was in danger. While the men were taking cover, Cota conspicously exposed himself, trying to inspire the men. With 80 to 100 men behind each of the 15 breakwaters, it was an inviting target for German mortars and howitzers. Cota encouraged the men to get off the beach. Meeting with Col. Schneider, he told him that his approximately 450 Rangers would have to lead the way. Turning to the Rangers, Cota yelled, "Rangers, lead the way!" The Rangers, along with the men from the 116th, did just that, using bangalore torpedoes to blow four holes in the wire beyond the road and moving into the flat area beyond. Advancing up the bluffs, partly on a trail, and inclining to the right, the men climbed through smoke from the brush fires that the bombardment had started. |

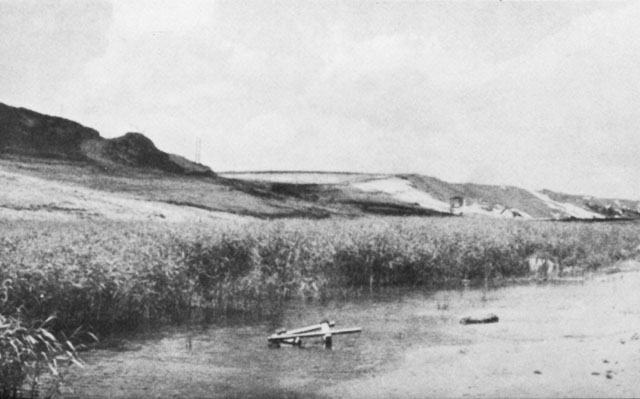
Around 500 yards to the right of the breakwaters, in front of WN 70, Companies A and B of the 2nd Ranger Bn landed, losing half their men and 5 of 6 of their officers just getting across the beach to the shingle. Company A, 2nd Rangers had no bank or seawall to protect them. There was also no wire in front of them, either, so they moved across the road, past the beach houses to the foor of the bluffs, right under WN 70. Climbing the bluffs, the men captured WN 70. Company B, 2nd Rangers advanced toward Vierville Draw, then, seeing the difficulty of completing the task, advanced up the bluffs and continued west along them. By that time a lost boat team of Co. D, 116th had landed and joined the Rangers. The breakthrough starting at the breakwaters, and starting here, was vitally important. The men moved inland and westward to Vierville. Cota himself would liberate Vierville Draw from the inland side, opening up the most difficult of all the beach exits. |
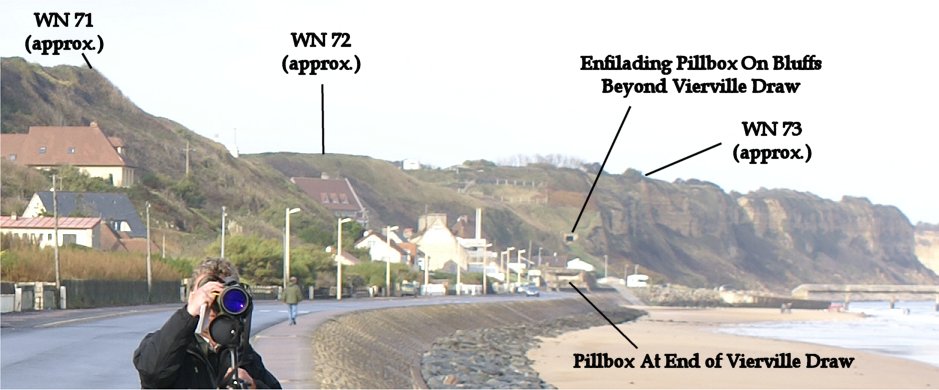 Zoom view of the right side of the panorama |

|
Meanwhile, on the east side of Les Moulins Draw, Major Sidney Bingham,
commander of the 2nd Bn of the 116th, determined that the three story
house had to be captured. many of the survivors in the area were
in shock, but Bingham got about 50 men, mostly from Company F, 116th,
to attack the house. With help from his executive officer, Major
Fred McManaway of Roanoke, Virginia, they crossed the barbed wire and
reached the house. Finding their weapons non-functional, they
sought shelter in a dugout to clean them. Returning to the house,
some of the men climbed to the top floor, but ther weapons still
wouldn't work. It was around 8:00. More men cut wire and
advanced up the bluff overlooking the draw. Col. Paul Thompson of
the 6th Engineer Special Bn had arrived 20 minutes earlier. Beach
clearing duties were clearly not appropriate yet, so Thompson lead his
engineers forward through wire to attack machine gun nests. Doing
the work of an infantry sergeant, Thompson was badly wounded but
survived. |
 |
|
Further east, between Les Moulins and St Laurent Draws, the 3rd Bn of the 116th had landed at around 7:30, far to the east of their original objective. Reaching the shingle at the edge of the beach, the men stopped. The bluffs to its front were not as well fortified or as well manned. It was the weak spot of Omaha Beach. Soon, the men decided to get off the beach, cutting the wire and advancing up the bluffs. Taking out an 88mm gun emplacement, they reached the top. The penetration here would open up Les Moulins Draw. |


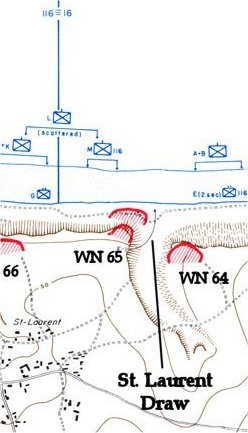 |
At around 7:40, the second wave started to come ashore. These were the reserve battalions of the 116th Regt of the 29th Division and of the 16th Regiment of the 1st Division. They would land on either side of the St. Laurent Draw. The 3rd Bn of the 116th came ashore on this side of St. Laurent Draw. Adjacent to them on the other side of St. Laurent Draw, the 1st Bn of the 16th landed. Being the second wave, the men expected to just mop up resistance. They were surprised that there were no men already on the beach in front of them. Like the other units to land, they ran under fire across the beach for cover. There, on the shingle, they were pinned down. |
 |
At around 10am, men who had landed between St. Laurent and Colleville Draws had attacked up the bluff. (See Colleville Draw section.) Advancing west along the bluffs, they captured WN 64 overlooking St. Laurent Draw from the east. At around 10:30, there were more landings to the west of St Laurent Draw by the 2nd Bn of the 18th Regiment, 1st Division. This was about 750 men, and by now, it was high tide. With assistance from tanks, naval fire, and other units, WN 65 was captured and several Germans taken prisoner by noon. By 3:00pm, engineers had made the draw usable for traffic. St. Laurent Draw was open for business. |