Cloyds Mountain Campaign
May 9, 1864
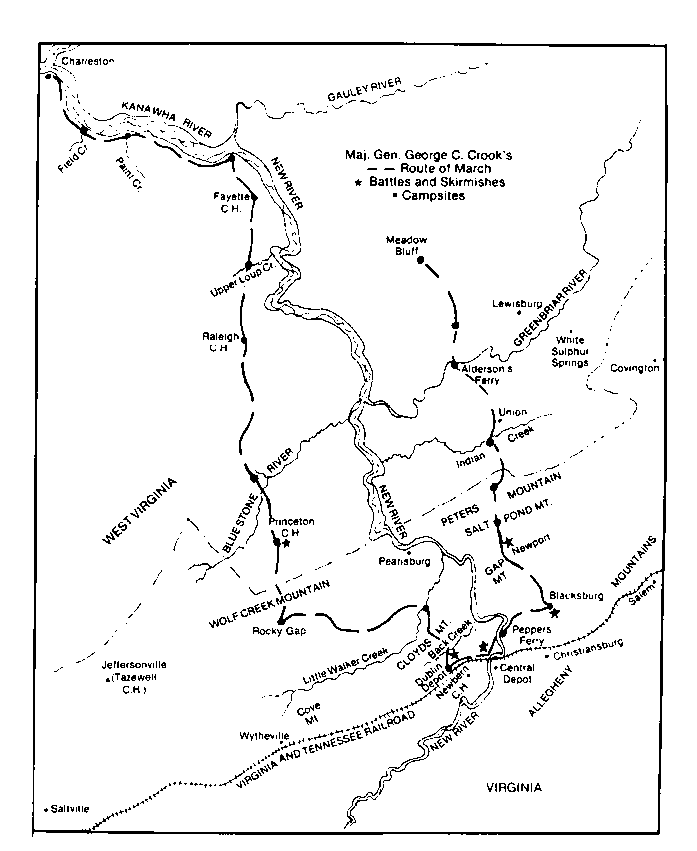
The battle of Cloyd's Mountain was overshadowed by the Battle of the Wilderness, fought at around the same time, and was largely forgotten until recent times. Even the location of the fight was forgotten! Howard McManus decided to research this campaign and battle for this master's thesis under Dr. James I. Robertson at Virginia Tech. His thesis has been published as "The Battle of Cloyds Mountain, The Virginia and Tennessee Railroad Raid," and is available from his antique dealership, The History Broker. He has been kind enough to let me use his maps for this page. The battlefield is on private property, and photos of the heart of the battlefield date to the late 1980s.
Gen. Grant, when planning his offensive of 1864, wanted to put as much pressure on the Confederates as possible, and in as many places as possible. Meade's Army of the Potomac would strike Lee while Butler advanced on Richmond, Sherman advanced on Atlanta while Banks made a foray up the Red River. In Virginia, Sigel with 6,000 men would advance up the Shenandoah Valley to Staunton and take Lynchburg if possible. A small diversion would be made at Lewisburg. William Averell with 2,000 men, mostly cavalry, would raid Saltville in the southwest, one of only two salt producers in the Confederacy, then move east, raiding the Virginia and Tennessee Railroad and the lead mines near Wytheville. He would link up with his superior, George Crook with 6,000 men, who would raid the railroad bridge over the New River at Central Depot, now known as Radford. Combined, Crook and Averell would then move to Lynchburg and link up with Sigel. This would secure the western part of Virginia, cut off valuable supplies, and threaten Richmond from the west. Operations this complex rarely work out according to plan, and this raid would be no exception.
The Confederate reaction to the Union offensive was confused. Lee ordered Gen. Breckinridge, the Confederate commander in southwest Virginia, to move 4,000 men from southwest Virginia to meet Sigel in the Shenandoah Valley. Breckinridge would defeat Sigel at New Market on May 15th, but the defenses of southwest Virginia had been severely weakened. Brig. Gen. Albert Jenkins was left in command of southwest Virginia with just 4,600 troops. McCausland's Confederate brigade had been in a good position to block Crook as he advanced on Princeton, West Virginia, but McCausland was ordered to Dublin to entrain for the Shenandoah. Reaching Dublin late on May 6th, McCausland began to entrain, but was then ordered off the train to remain in Dublin, where he camped that night.
Ringgold's battery was shanghaied from rail travel and sent
north to confront Crook. The Home Guard of
Christiansburg was called out, and these men and all other available troops were
also sent north from Dublin to stop the enemy.
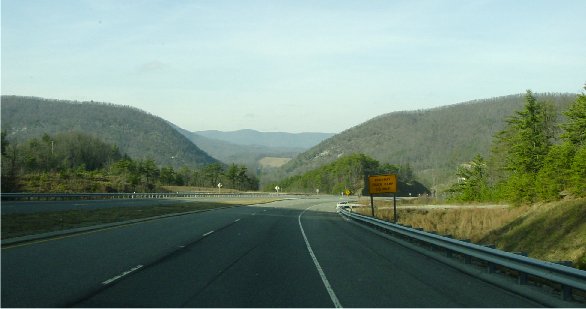
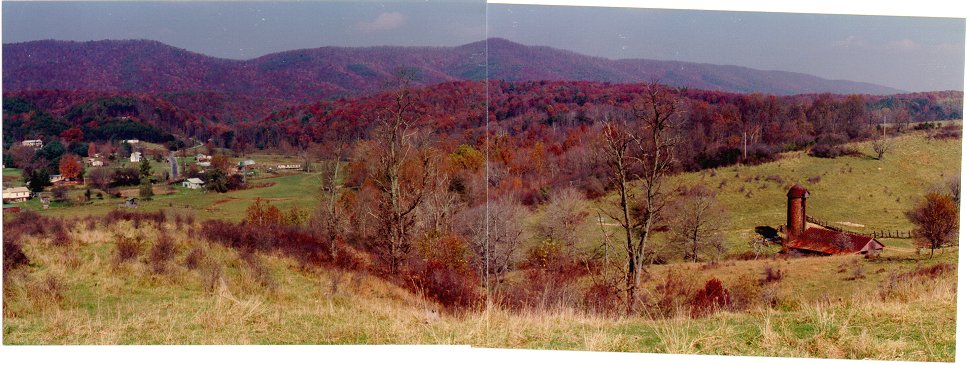
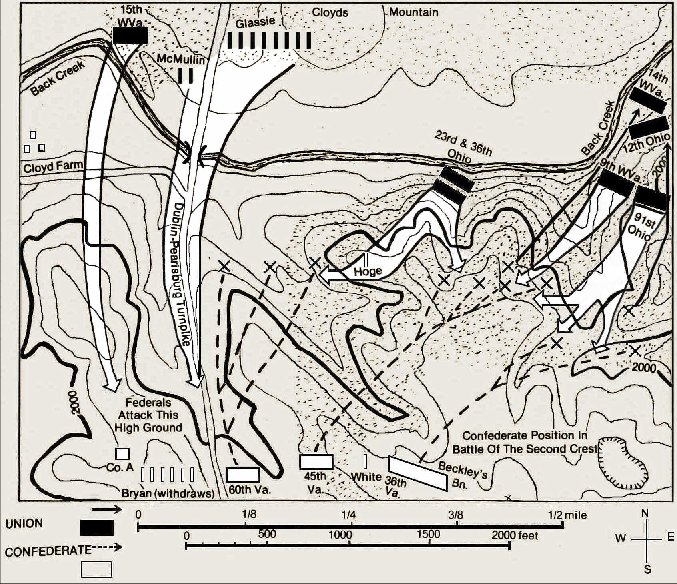
View From the Gap Through Cloyd's Mountain
Locals, including the Home Guards, believed that the gap through Cloyd's Mountain was the ideal place to block Crook. The gap, at 2,400 feet of elevation, towered 500 feet over the land to its north, where Little Walker Creek cut through Walker Mountain, another defensible choke point. These gaps, however, may have been easy to flank, and were not selected for the main defense.
The Ringgold artillery was first to arrive on the scene and instead deployed along a ridge south of the mountain, on the left side of the Dublin-Pearisburg Turnpike, with good fields of fire for the guns. McCausland placed skirmishers at the gap but had the bulk of the infantry deploy in line with the artillery south of the mountain along gently sloping high ground 400 yards behind some steep bluffs. His intention may not have been so much to stop Crook, but rather to delay him, then withdraw. When Jenkins arrived on the morning of the 9th, he had a heated discussion with McCausland, and the infantry moved forward to the edge of the bluffs, a much better defensive position. By the morning of May 9, 1864, Jenkins had 2,400 men and 10 pieces of artillery in position. Crook was rushing south to meet him with 6,500 men and 12 pieces of artillery.
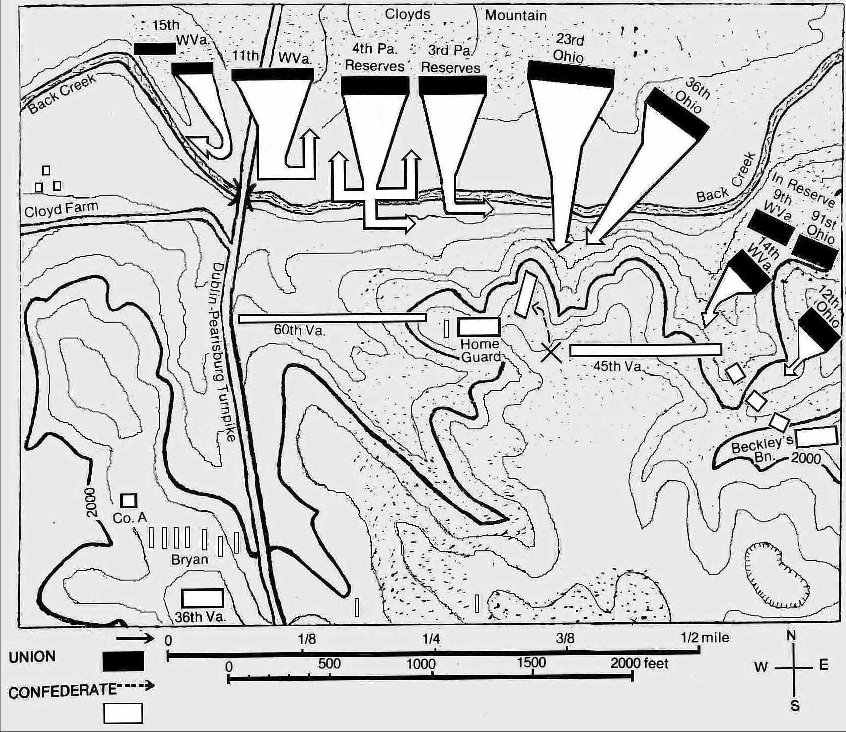
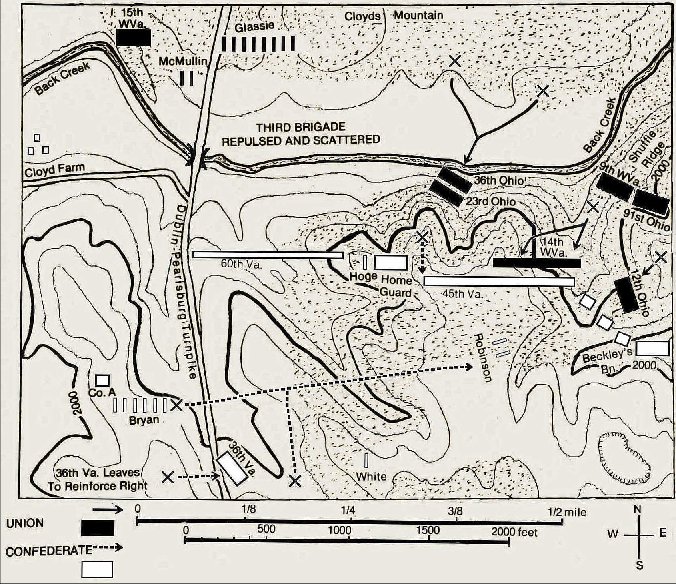
Battle Map
This is a scan of a map used with permission from Howard McManus's book showing the Confederate position and the opening of the battle. Bryan's Confederate artillery dominated the left and center of the position with a clear field of fire. The 36th Va. was in reserve, while the Home Guard was in the center. Connecting the Home Guard to the road was the 60th Va., while the right was protected by the 45th Va. and Beckley's Bn.
Confederate Position
This is a photograph from the Confederate center toward the hill occupied by Bryan's artillery on the left flank. Artillery on this hill dominated the center and left of the position. Crook flanked the skirmishers that had been placed on Cloyds Mountain, and could then see the imposing Confederate position down below. Crook wisely decided the best course of action would be to flank the Confederates on their right, so he ordered Col. White's Second Brigade to follow the lead of a local black guide. The Third Brigade would be on the Union right, near where the road emerges from the woods in the picture, and the First Brigade would be in the center, off the picture to the right. Col. White positioned his Second Brigade on the Confederate right flank and waited for the signal to attack which was to be three artillery shots.
Crook, however, had ordered his artillery to move down
the mountain and deploy in the field near the Third Brigade. This would
distract attention for the coming infantry attack, but predictably, the
Confederates won the artillery duel.
The 45th Virginia
Col. White of the Second Brigade was confused by the artillery duel, since the attack should begin with three shots. He used his judgment and ordered his troops to attack. This photograph is from the position of the 45th Virginia's right flank, looking toward the Cloyds Mountain on the left. You can see a road in the lower ground on the left, and we will see the view from there later. Shuffle Ridge is on the right of the picture, where the Union Second Brigade marched to take the enemy's flank. The 12th Ohio was on the ridge on the right of the picture beyond the barn, while the 14th WVa. was in the wooded valley in the center of the picture. The 9th WVa and 91st Ohio were in reserve behind the ridge on the right. At the time of the battle, these areas were wooded.
At 11:00, the Union troops pushed back skirmishers and attacked the 45th Va. behind a rail fence. The 14th WVa halted 20 yards from the fence and repeatedly fired. Here they stood exposed for nearly half an hour being cut down, but refusing to advance. The 12th Ohio was also stopped short of the fence, and they were being fired on from Beckley's Bn. on their left. Jenkins and McCausland ordered artillery, two companies of 60th Va., and the 36th Va. to reinforce the right flank.

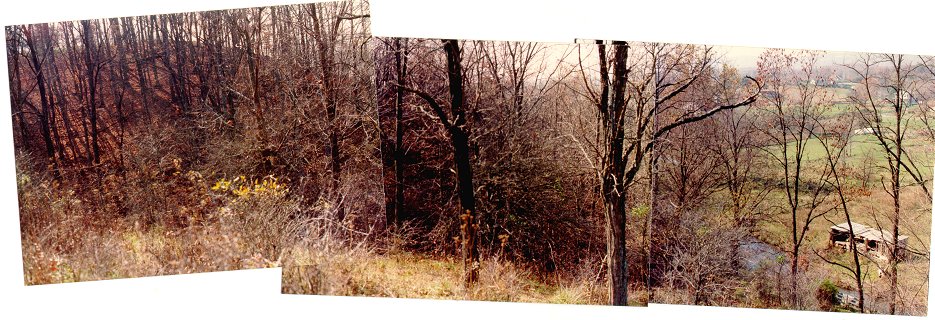
View From 3rd and 4th Pa. Reserves Approximate Jump-Off Point
The Union flank attack had signaled the rest of Crook's men to attack. They rushed across the open field in front of the Confederate position and were met with withering fire. In this approximate area, the Union 3rd and 4th Pa. Reserves began their attack. Confederate artillery on the clear hill in the center of the picture, and across the Turnpike, enfiladed the attackers. Confederate infantry, mainly the 60th Va. and the Home Guard on the wooded ridge on the left of the picture, would fire on the Yankees frontally.

3rd and 4th Pa. Reserves Attack
This is the view further down the slope. Part of the 45th Va. advanced to a small perpendicular ridge jutting out in front of the main ridge so that they could enfilade the Pennsylvanian's left left. This infantry fire, along with the the frontal infantry fire and the enfilade artillery fire from the cleared hill on the right (right-center of the picture), struck down more than one hundred of the Pennsylvanians, including a colonel. The Pennsylvanians had made the mistake of stopping to fire, ineffectually - as was predictable, and wasting valuable time, further exposing themselves to enemy fire. Many of the Yankees fled to the rear, but the few that made it across Back Creek near the foot of the ridge were led toward the left to protect themselves from the artillery. They would remain at the foot of the ridge until the climax of the battle.
23rd and 36th Ohio Attack
To the left of the Pennsylvania Reserves, two Ohio regiments, the 23rd and 36th, Col. Rutherford B Hayes's 1st Brigade, were not quite prepared to attack, but did so anyway. White's Second brigade, in its flanking move, had advanced along Shuffle Ridge, the wooded ridge on the left of the picture, and attacked across the ravine visible here beyond the wooden barn on the left.
Hayes's men advanced down the lower slopes of Cloyd's Mountain then across this relatively flat land, facing the same frontal and enfilade fire their comrades further right had endured. Not stopping to fire, and with their left not quite to the ravine, the veteran Ohioans reached the creek at the foot of the ridge, driving back the Confederate skirmishers, but they were pinned down directly below the Confederate position. Accompanying the men was Crook himself, who had to be helped across the creek when his boots filled with water.
Beckley's Battalion
Back on the Confederate right, the 12th Ohio and 14th WVa began to fall back. Beckley's Bn. was positioned near where this picture was taken and toward the right of the picture. These men attacked the retreating Federals in front and flank as the 45th Va. attacked those to their front. It looked like the Confederates would be victorious. The 9th WVa and 91st Ohio in reserve were behind the ridge on the left of the picture. These men allowed their comrades to pass through their ranks, and waited to ambush the Confederate pursuers. When the Confederates were within a few feet, the Yankees opened fire and pursued the Rebels. ( This letter, unavailable when Howard McManus was researching the battle, was e-mailed to me by Dave Waltman of Baltimore, and talks of this phase of the battle. )
Gen. Jenkins was wounded trying to rally his men, and McCausland took command. The 36th Va. had been sent to support the right flank, but since Union troops were now attacking the Confederate artillery on the left, McCausland ordered the 36th Va. to return to its original position, even though it was unlikely to return in time. At the same time, the 45th Va. was nearly surrounded. Possibly because of this error in judgment, the 36th Va. and the artillery reinforcements couldn't stop the Union flank attack and instead got caught up in the confusion. The Confederate position was beginning to deteriorate.
Hayes Attacks
Meanwhile along the Confederate center, the 23rd and 36th Ohio Regiments, which had been pinned down below the ridge, were rallying under future President Rutherford B. Hayes. This photograph shows on the right Back Creek and the field the Federals had charged over. At the bottom of the hill at the creek, the Federals were reforming. On the left of the picture is the top of the ridge the Confederates were defending, specifically a protuberance that part of the 45th Va. had advanced on to enfilade the Pennsylvania Reserves, but the Confederates had since reinforced their right flank with the troops on this protuberance. Hayes led the two Ohio regiments up this hill and into hand to hand combat with the Home Guard troops in the Rebel center. The photo below is from the Home Guard's position.
From Home Guard Position
Hayes's attack, along with the collapsing Confederate right and a Union attack
on the now virtually unprotected artillery on the Confederate left, meant that
the Confederates
had no option other than withdrawal.

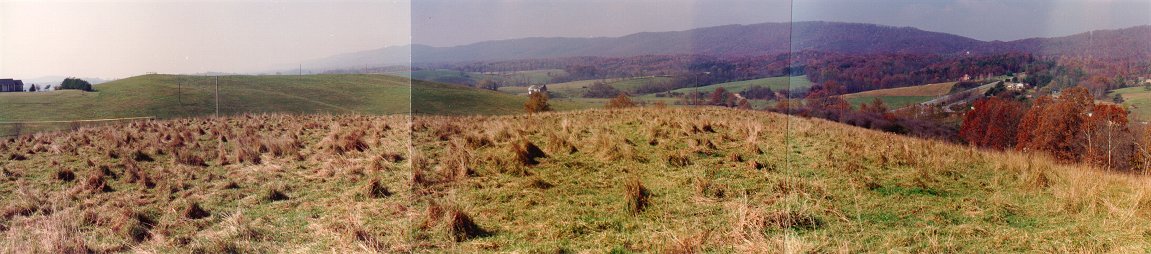
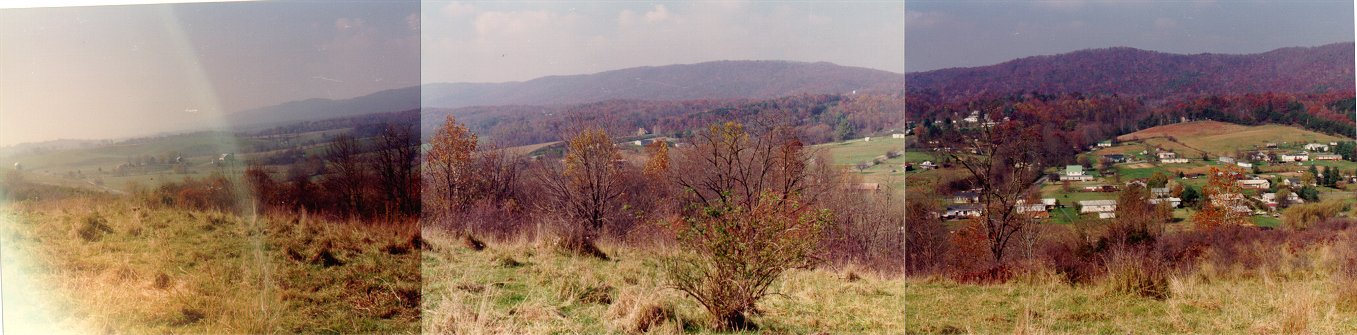
Second Crest
The Confederates briefly rallied a little to the rear, on
the
relatively gentle ridge just to the rear of their battle position - the one
McCausland had originally hoped to defend. The
driveway coming off the Turnpike on the left of the picture runs along this
ridge. With just a light line left, on their left the Confederates faced Union cavalry and artillery, which had advanced up the Turnpike.
After about fifteen minutes of fighting, McCausland ordered a retreat.
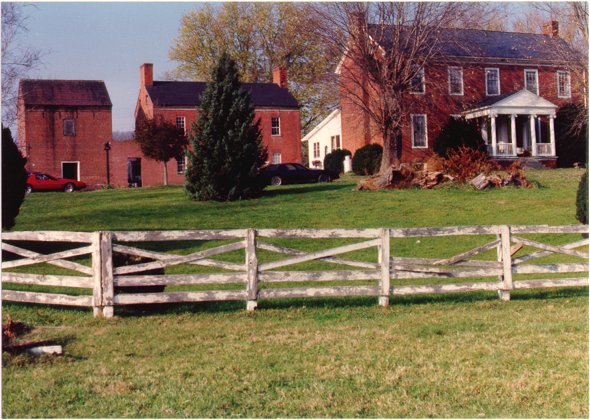
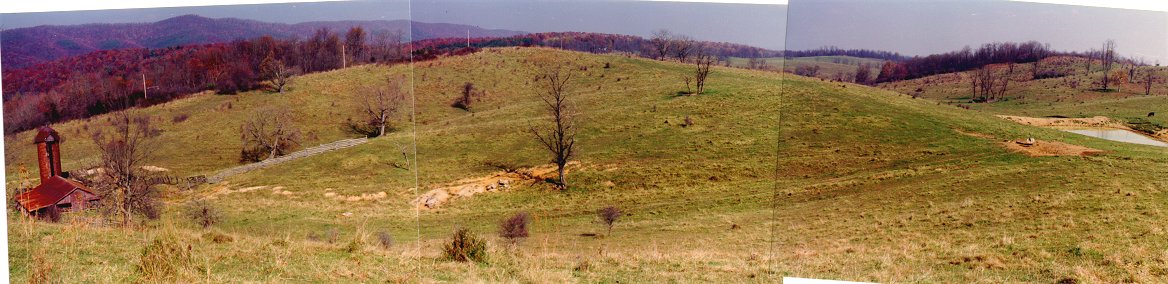
Cloyd Farm
The battle had lasted for more than an hour, but the Federals sustained 10% losses, and the Confederates 23%. The 45th Va. suffered about 40% casualties, while the 60th Va. and 36th Va. lost about 22%. On the Union side, the 9th WVa. lost 37% and Hayes' 23rd Ohio about 20%. Around 500 wounded were brought to the Cloyd farm, which was used as a hospital. Smallpox broke out, and 60 to 75 men were buried nearby. Eventually Gen. Jenkins was brought to the hospital, and his arm was amputated. Jenkins appeared to be doing well until an attendant accidentally knocked off his bandage. Jenkins bled to death.
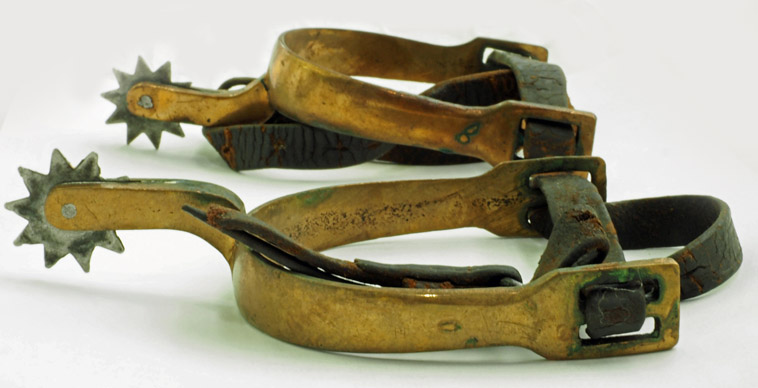
Jenkins's Spurs
In tribute to his contributions to Union victory, General Jenkins' spurs were given to Rutherford B Hayes. They are now in the archives of the Rutherford B Hayes Presidential Library - many thanks to the library for allowing me to see and photograph them.

Rearguard Action The Confederates fled to Central Depot to protect the bridge over the New River. The Federal pursuit was not as effective as it could have been as Crook had available only 400 cavalry under Olney. McCausland, with around 100 men, was covering the Confederate rear and ambushed the Union cavalry, checking their progress. Then the 400 men of the Confederate 5th Kentucky Cavalry arrived from Dublin to help protect the retreat. Somewhere near here, they took up position in some woods and clashed with the pursuing Federals. In a counterattack, Christopher S Cleburne, brother of the general, was mortally wounded. He is buried on the field. In time, more Union troops showed up and flanked the position, forcing the Confederates to withdraw, but the action had gained valuable time for the main Confederate force to escape.
|
Christopher Cleburne's Grave |

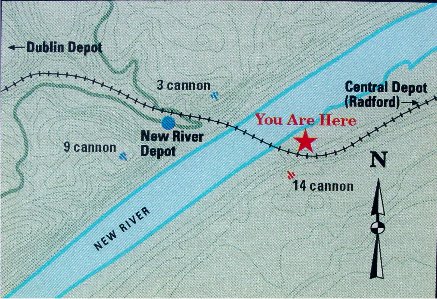
May 10th, New River at Central Depot (or Radford) - From Confederate Side (at "You Are Here" on the map) McCausland decided against defending the fortifications on the west bank of the river, fearing that his whole force would be captured. Instead, he decided to defend the bridge from the lower ground on the opposite, or east, bank. Crook placed guns on the two pieces of high ground visible in the picture on either side of the modern railroad on the opposite bank. (The modern railroad takes a slightly different route than the wartime one.) The artillery duel resulted in few casualties, but one of the killed, a soldier who had refused to go to ground until Col. Rutherford B. Hayes got off his horse, was killed soon thereafter and was found to be a woman. |
 |
A Confederate gun ran out of ammunition, and the whole rebel artillery then withdrew. Union infantry reached the covered railroad bridge and set it afire, but all efforts to bring down the supports failed. With nothing left to defend, the rest of the Confederate force withdrew east. The Confederates had lost 2 killed and six wounded, and Yankees probably twice as many. Most of Crook's little army crossed the river further north at Pepper's Ferry.
On May 11th, Averell's men began entering camp. He had failed to take Saltville, was turned back at Wytheville, and had succeeded only in destroying some of the railroad. Since Crook had heard nothing of Sigel's advance in the Valley, he abandoned plans to move on Lynchburg, and instead retreated back into West Virginia, taking a difficult road up to Mountain Lake to avoid the easily defensible Narrows of the New River, manned by 800 Confederates under Col. William L. "Mudwall" Jackson.
So the raid's potential to decisively effect the war was not realized. And since the supports of the bridge were undamaged, the bridge was repaired soon thereafter. The raid had been at best a partial success. Despite a few further skirmishes, the raiders reached safety on May 19th in Meadow Bluff, West Virginia.
Back to Civil War Virtual Battlefield Tours
