The Peach Orchard - Part 2
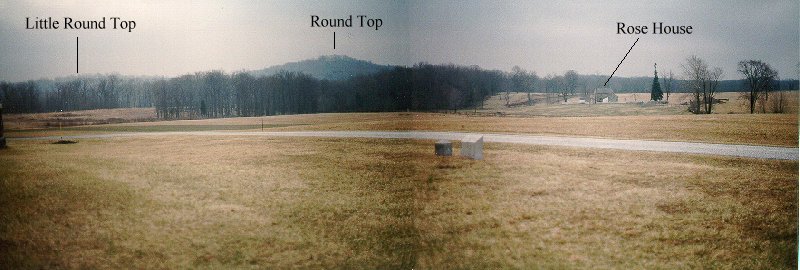
Looking South From the Peach Orchard
Graham's brigade held the salient at the Peach Orchard. This is the view from the southern side of the salient. Off the picture to the right is the Emmitsburg Road. The woods behind the Rose House are where Robertson's, Anderson's, and Benning's brigades moved to attack through the Wheatfield, Devils Den, and Little Round Top. The wooded hilly area just to the left of the Rose House is known as the Stony Hill. The Stony Hill was attacked by Kershaw's brigade with Semmes' in support. Obscured by the woods on Stony Hill ridge is the Wheatfield, beyond which are Round Top and Little Round Top.
Off the picture to the left between the cameraman and the cleared ridge, Union batteries enfiladed Kershaw's brigade as it attacked the Stony Hill. A portion of the brigade moved to attack the Federal artillery position and took heavy losses before it was repulsed. One section of Union artillery in the Peach Orchard advanced toward the southeast corner of the orchard and was briefly captured until recaptured by the counterattacking 141st Pa. After a heavy bombardment by sixty guns, including enfilade fire, the Peach Orchard was attacked by McLaws' division. Kershaw's left flank once again attacked the Union guns along the Wheatfield Road as part of this successful assault.
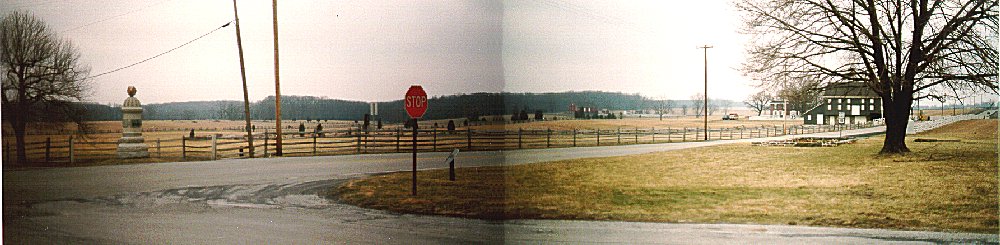
The Peach Orchard Looking Northwest
This is the view from the Peach Orchard looking northwest. Graham's brigade occupied this salient in the III Corps position. The road that disappears to the upper right is the Emmitsburg Road, which marks the line of the III Corps. The buildings along the road are the Sherfy Farm. After sixty Confederate guns battered the Peach Orchard from two sides, McLaws' division attacked. The Confederates of Barksdale's brigade with Wofford's in support emerged from the woods on the left of the picture and advanced on the salient. The 57th and 114th Pa. Regiments moved forward around the Sherfy Farm to meet their attackers but took heavy losses and fell back to the road. Graham's brigade took heavy losses and was unable to hold the salient. The Confederate penetration occurred near the Wentz house, the foundation of which you can see on this side of the Emmitsburg Road just beneath the Sherfy barn. Union regiments from the rear tried but failed to seal off the penetration, with one of them, the 141st Pa., losing 156 of its 209 men. The Confederates captured around 1,000 Federals.
The fields on the far right behind the Sherfy Farm were the scene of the advance of Wilcox's and Perry's brigades against Humphreys' division along the Emmitsburg Road. These Confederates flanked the Union line further north. As the Federal position at the Peach Orchard collapsed, most of Barksdale's brigade wheeled left, advanced to the area of the Sherfy Farm and helped turn Humphreys' division out of its position. Other Rebels advanced straight down the road at the bottom right of the picture to assist their comrades in the Wheatfield.

Kershaw's Brigade and Bigelow's Battery
This is the view along Wheatfield Road to the east of the Peach Orchard. On the far left, you are looking over the Wheatfield to Little Round Top. Kershaw's brigade had advanced from area of the tower to the Rose farm, which is obscured by woods. The brigade split, and its right portion attacked in flank Tilton's brigade on Stony Hill and pushed it back to Trostle's Woods on the far right of the picture behind the Mark III Battlefield Cruiser. The left portion of Kershaw's brigade had advanced on the Union artillery here along the Wheatfield Road. Being unsupported, the gunners were about to limber up and leave, but due to confusion about orders within Kershaw's brigade, the troops were diverted toward Stony Hill. Although this great opportunity to turn the Peach Orchard was lost, with Barksdale's attack and the subsequent collapse of the Union troops in the salient, combined with a renewed Confederate attack here, the artillery along the road withdrew.
Rightfully the most famous of the batteries, Bigelow's 9th Mass. Battery, located originally near the first monument along the road, most famously fell back to the Trostle farm. The last of the batteries to retreat, and falling back by the guns' recoil while guided by prolonges, the ropes usually coiled around the carriages, the guns were halted at a fence corner at the Trostle farm. Col. Freeman McGilvery ordered the battery to remain and buy time while he organized a line of guns 300 yards closer to Cemetery Ridge, visible beyond, and to the right of, the Trostle Farm. With the enemy getting in behind him, Bigelow's men withdrew with two of their six guns having suffered 28 casualties.
Meanwhile Wofford's Confederates, who had been supporting Barksdale, continued straight down the road to the Wheatfield, breaking the deadlock there, while Barksdale was taking in flank the Union Emmitsburg Road line.