Hastings
October 14, 1066
On the death of Edward the Confessor, Harold Godwinsson was crowned King of England. Harold Hardrada also claimed the throne and his Viking army invaded northern England. It was decisively defeated at Stamford Bridge east of York. King Harold then rushed south to deal with another claimant, William Duke of Normandy, who had also invaded with an army and was ravaging the countryside. Harold took up a defensive position around 700 yards long on a ridge. The ridge crossed a spur which descended from the Downs, a then wooded line of hills in southeastern England. The position of his approximately 7,500 man army was protected on its flanks by relatively steep terrain and woods, and to its front by wetlands below. Only about 2,000 of his men were housecarls, well-trained and well equipped professionals. William had an army of 7,000 men, a higher percentage of which were good troops, including mounted knights and archers.
Little definite is known about the battle, but here is a brief synopsis. William first attacked with light troops armed with missile weaponry, then with heavy infantry supported by cavalry. The Norman left fled but was rallied by William, and Norman cavalry destroyed the pursuing English troops. The Norman cavalry attacked the English line again but failed to break the enemy. Whether an intentional ruse or not, the attacking Normans fell back and once again successfully turned on their pursuers. As the day was drawing to a close, William attacked again with his whole force, light and heavy infantry and cavalry. This time the attack was successful and Harold was killed. (By closer inspection of the Bayeaux tapestry, it is now thought that Harold was killed by sword and not by an arrow to the eye.) The Normans pursued and gradually gained control of southeastern England. William did not attempt to storm London, but ravaged the countryside until the city and important English leaders submitted. William was crowned King of England on Christmas day.
Perhaps seeing it as the method of least resistance, William and his successors kept the people's governmental representative body, and this would eventually lead to the development of Parliament. William was much less tolerant of the English nobility, and many were replaced by Normans as a reward for their services, and the continental system of feudalism was adopted. New and formidable stone castles were built throughout England to keep the newly conquered country under control. These included the Tower of London and Dover Castle.

Model
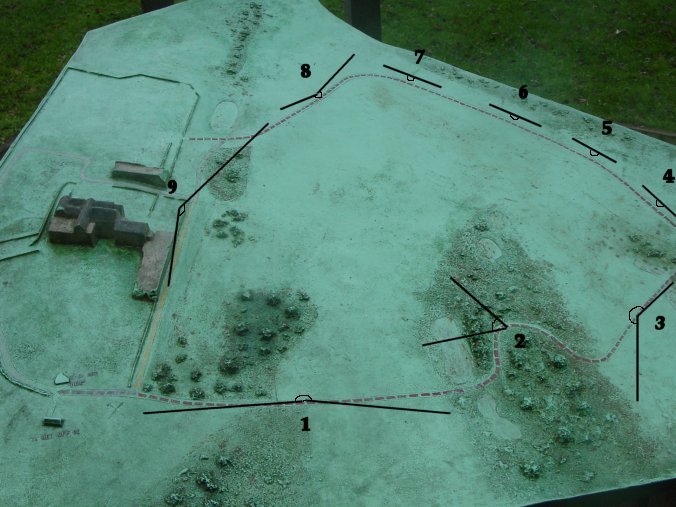
This model on display at the battlefield shows the abbey complex on the left where the English line was deployed and which marks the location of Harold's death. The Normans advanced generally from the right to the left. A trail now passes through the battlefield, and it includes signs with brief explanations of the battle. I have added the numbered lines to show the approximate location on the battlefield where each picture was taken. The lines give an indication of the field of view of each photo, and the crude semi-circles show the direction of each view. As you can see, some pictures are greater than 180 degrees. Photo 9 is generally the English view, and 8 is actually two shots from a similar area. The quotes are from sign located near the appropriate picture.

Photo 1
"The First Norman Attack - The battle opens at 9 o'clock to "the terrible sound of trumpets". William's infantry advances up the hill to attack the shield-wall. After a time the Norman cavalry joins in to strengthen the assault."

Photo 2
"The Norman Retreat - After ferocious fighting the Norman attack hesitates and breaks. Harold's men eagerly begin to pursue the retreating Normans down the hill."

Photo 3
"William Rallies his Forces - A rumour spreads through the Norman ranks that William has been killed. To give his soldiers confidence, William shows his face and calls out that he is alive."
Although there are now ponds, one of which is visible, the area to the right of the picture was lower and swampier at the time of the battle.